DIY: Turn an Old Servo into an LED/Buzzer Controller
- DAS PILOT

- May 24, 2025
- 1 min read
Got a dead servo? Don’t toss it—convert it into a simple LED or buzzer controller for your RC project!
🔧 What You’ll Need:
Old servo motor
Two resistors
Soldering tools
Multimeter (optional)
LED or buzzer
Hot glue
RC receiver (with toggle switch channel)
⚙️ Steps:
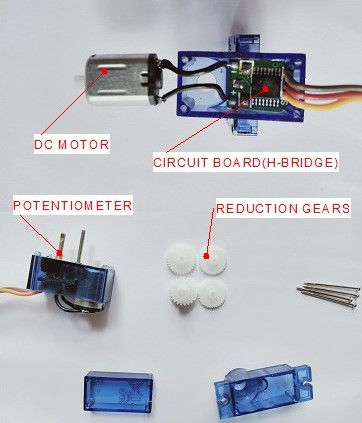
Open the Servo: Remove the 4 screws, take out the gears, circuit board, and potentiometer.
De-solder Parts: Remove the potentiometer and motor wires from the board.
Measure or Estimate Resistance: Use a multimeter to find potentiometer resistance (e.g., 5kΩ).No multimeter? Just center the knob and glue it in place.
Replace Pot with Resistors: Connect two resistors in series to match the pot’s value. Solder one end to GND, the other to VCC, and the middle to signal.
Connect the Output: Hook the motor wires to an LED or buzzer.
Plug into RC Receiver: Connect the servo plug to any channel with a toggle switch.

Done!
Flip the switch and enjoy your DIY controller. Great for lights, buzzers, or simple add-ons to any RC setup.


Comments