Build a Drone Using Daspilot Plugfly Flight Controller (Complete Guide)
- DAS PILOT

- Apr 3
- 3 min read
Building a drone doesn’t have to be complicated or time-consuming. With the Daspilot Plugfly Flight Controller, you can assemble, calibrate, and fly your quadcopter with minimal effort—even if you’re a beginner.
This guide walks you through the complete process—from selecting components to your first flight.

🔧 Recommended Components
For this build, we recommend the following setup:
Motors: 1400KV Brushless DC Motors
Propellers: 8-inch
ESC: 30A ESC with 5V BEC
Frame: F450 Quadcopter Frame
Battery: 3S 2200mAh 25C LiPo
Flight Controller: Daspilot Plugfly
Receiver & Transmitter: PPM-supported system (Flysky FSi6)
🛠️ Step-by-Step Assembly
Step 1: Assemble the Frame
Start by assembling your F450 frame. Ensure all arms are tightly secured and aligned properly.

Step 2: Mount the Motors
Fix all four motors onto the arms of the frame using screws.

Step 3: ESC & Power Connections
Solder the ESC power wires to the frame’s Power Distribution Board (PDB)
Connect each ESC to its respective motor


Step 4: Install Plugfly
Use foam double-sided tape to mount the Daspilot Plugfly on the top side of the frame.
👉 Make sure it is:
Firmly fixed
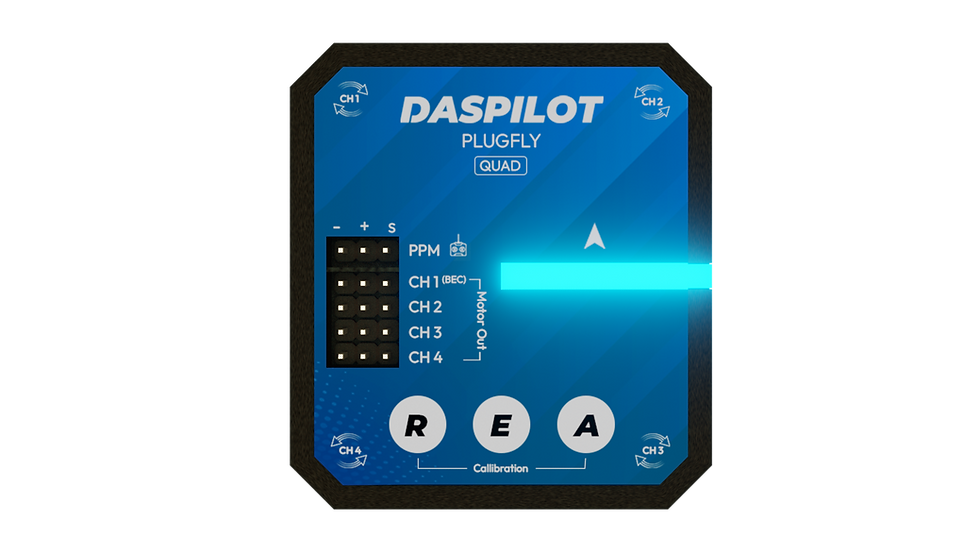
Properly oriented (follow arrow direction on board)

Step 5: Connect ESCs to Plugfly
Connect the ESC signal wires to the 4 motor channels on Plugfly as labeled on the board.
Step 6: Connect Receiver
Use the provided cable to connect your PPM receiver to the Plugfly PPM port.

⚙️ Calibration Process
Plugfly simplifies calibration using onboard buttons:
R Button → Radio Calibration
E Button → ESC Calibration
A Button → Accelerometer Calibration
📡 1. Radio Calibration

Center all trims on your transmitter
Enable PPM mode
Keep sticks centered, throttle low
Hold R button for 5 seconds
👉 Yellow LED will flash → calibration in progress👉 Do NOT move sticks during this
✅ Verification
Input | LED |
Roll Right | Green |
Pitch Up | Green |
Yaw Right | Green |
Throttle Up | Green |
Roll Left / Pitch Down / Yaw Left | Red |
Throttle Down | No light |
👉 If incorrect → reverse that channel in transmitter
After completion → Restart Plugfly
⚡ 2. ESC Calibration

Hold E button for 5 seconds → solid white light
Disconnect and reconnect battery
Flashing white light = full throttle signal
Press E button again → low throttle
👉 ESCs will complete calibration tones👉 Wait for green light
Restart Plugfly again.
📏 3. Accelerometer Calibration
Keep drone on a flat, level surface
Hold A button for 5 seconds
👉 Red light = do not move warning👉 Flashing red + blue = calibration in progress👉 Green light = complete
Restart Plugfly.
⚠️ Important Boot Behavior
Red light after power ON: Do NOT move drone (gyro calibration happening)
Flashing red + blue: Normal operation (ready to use)
👉 Calibration buttons only work after full boot (blue blinking state)
🎮 Arming & Disarming
Arm: Hold Yaw Right for 2 seconds
Disarm: Hold Yaw Left for 1 second
👉 Auto-disarm occurs if idle for 5 seconds

🔄 Motor Direction Check
Correct motor rotation:
Front Left → Clockwise (CW)
Front Right → Counter-Clockwise (CCW)
Rear Right → Clockwise (CW)
Rear Left → Counter-Clockwise (CCW)
👉 To reverse motor direction: swap any two ESC wires
🚀 Final Steps Before Flight
Install propellers (tighten properly)
Double-check all connections
Ensure battery is charged
Now you’re ready to fly! Always test in an open area.
🧯 Troubleshooting
🔴 Red Light After Radio Calibration
PPM not enabled
Incorrect wiring
Receiver/transmitter not PPM-compatible
⚙️ 1–2 Motors Not Spinning
ESC calibration incomplete
Low-quality ESCs not supporting 250Hz refresh rate
🌀 Drone Drifting After Takeoff
Drone moved during startup (gyro miscalibration)
Uneven surface during calibration
Poor-quality propellers causing vibration


Comments